pictsidhe
Well-Known Member
Diameter and weight.Just ordered a 919 bar based on this comment, are there any measurements I can take for you that would be helpful before I put it in the car?
Diameter and weight.Just ordered a 919 bar based on this comment, are there any measurements I can take for you that would be helpful before I put it in the car?
Disconnecting the tiebars make this job an order of magnitude easier. It was nightmare without doing that. It's much quicker and easier when you aren't wrestling it. You only need to remove a few battery bolts on to the rear subframe. The battery looked very solid. Consider that it is bracing the rear subframe...Thanks again for the insights! How bad was it pulling the subframe back rather than dropping with gravity assist? Do you think it would have been much easier on a lift? Also, how floppy was the battery box, like should I be ready with a scissor jack or something to support it while abusing the subframe?
I ordered the 22mm NMeng. bar and Whiteline adjustable links. I did not spring for the grease fitting mounts.
Damn, do I need to find a set of huge 15" wheels, now?I tried it last year during SCCA races. It gave me more power out of tight turns and the tires were spinning lots, but it also cut the abs completely and I was having a really hard time slowing down in a hurry without locking up, making lots of expensive smoke.
On another note, I had my 1st event in EVX last Sunday, after lowering on H&R springs and Bilstein B8 shocks in the back. I also mounted 225/45/17 Falken rt615's on Motegi Tracklights 17x8.5 42 et. I had some rubbing in the back and had to cut the plastic wheel well arch and also use some spacers under the spring insulators. Also cambered the rear wheels to the max. I wish I'd gone with less of a drop. Anyway, I came in 1st in EVX class, beating 2 Tesla model 3 performance and a model S plaid! That after being told I wasn't going to be competitive against them when I showed up. Next, I'll be installing adjustable camber plates up front for some negative camber to keep my tires from peeling like last year.
Will do! Might be a few weeks before I can get back to you, I ordered a new one from a dealer which means it's coming from a supply warehouse in Germany.Diameter and weight.
The helmet has just two reviews. Not really enough to come up with a consensus.Dropped my helmet a year ago. Cracked and no longer safe to use.
Is this seller legit?
https://www.typhoonhelmets.com/prod...KN_0jsBpqFg3wdpjyM7UsBYJN5JI7clQaAv0NEALw_wcB
Sent from my iPhone using Inside EVs
Diameter and weight.
That’s weird that they want to discharge the battery. That either means they would discharge it to 0 volts, which would irreparably damage it, or just discharge it to 0% usable capacity, which would leave it at over 300V which is still plenty dangerous.
No way it should take an experienced tech 9 hours. Show someone this amateurs instructions in post 4.I opted not to change the rear bar after being no-bid by a local performance shop and then STRONGLY dissuaded by the dealership. The dealership said it was at least a 9 hour job and if anything goes wrong it's off-warranty. I think the dealership probably fully discharges the battery and electrically disconnects the box that blocks the required bolts, drops the subframe on a special jack attachment, then goes thru a comprehensive battery reset and check. Hat's off to @pictsidhe, apparently it's doable, carefully, by a more experienced mechanic than myself without bothering the battery... much.
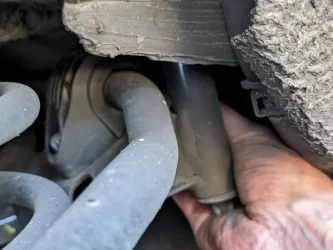
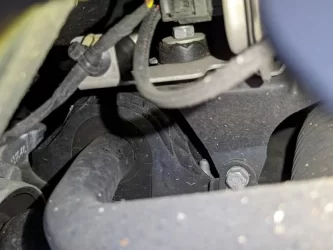
You know what makes me wanna cry? The front ASB bracket bolts in from below! You can reach the back of the rear bracket with your hand... WTF did they not make the back like the front? First photo showing my hand where the rear bracket bolt heads SHOULD be, second photo is the front bracket with the ends of the screws poking through the top. I think it's entirely possible to put threads in the bracket and insert the bolts from underneath. Once you get the stuff out.
I did wonder about drilling the threads out to fit through bolts from underneath, then weld nuts on the brackets. But it looked very difficult to do straight with the subframe in the car, you still need to move the subframe to get the bar in and out... Grease nipples on the brackets may help. Though mine squeaked on one side no matter how many grease shots I gave it. I am seriously considering making my own hollow bar, and casting rubber bushings on like the factory does. That damn squeaking...I'm holding on to my NM 22mm rear bar for now. I had high hopes for a local competition-oriented shop who said they would do it. But I brought my SE there for a wheel alignment (done to GP3 specs, which came out really well) unfortunately they failed to torque my lug nuts and my wheels were a bit wobbly by the time I got home. IDK if I can trust them with inaccessible fasteners...
And if I do this, I would plan to make body brackets that bolt in from underneath, so when the inevitable squeaking sets in, basic maintenance can be done without a huge production.
I've decided to make some brackets to shorten the effective rear ARB arm for the last few events of this season. Since I don't spend much time autocrossing, weird link angles aren't going to trash bushes. Depending on how that feels, I may make a new bar for next year.
Do you have part numbers for the camber correction hubs?Two reasons to do only one side:
1) it's easier and quicker!
2) if steering is straight when driving straight ahead, it is set at daily driver. If the wheel is left ( I only add toe out to the right) it is in set for cone dodging. As I turn a certain number of flats, this reminds me I may need to reset it... If you are less absent minded than me, go ahead and spend more time doing both sides for a few minutes of driving like you stole it.
Thanks for the GP3 alignment. I will measure my current alignment and compare. But I have a feeling my toe settings are already more aggressive, though camber is not. The main difference from the F56S is an extra -1° of front camber. The SE uses the GP3 front knuckles, but the raised ride height backs the camber off to -0.5°. Did you add front camber correction hubs? Mine was close to -0.5 front as stock. I added the correction hubs for an extra -0.5 to give -1. I maxed out rear camber hoping to slightly offset the loss of rear grip from the stiffer ARB. It's slightly less than S/GP3, but within tolerance. The reduced roll of the SE may well put dynamic camber slightly more favourable than the GP3. The stock rear camber is 0.5° less... Everyone comments on how little my car rolls. You have a lot of toe out at the back, isn't that tiring on highways?
I've decided to make some brackets to shorten the effective rear ARB arm for the last few events of this season. Since I don't spend much time autocrossing, weird link angles aren't going to trash bushes. Depending on how that feels, I may make a new bar for next year.