You are using an out of date browser. It may not display this or other websites correctly.
You should upgrade or use an alternative browser.
You should upgrade or use an alternative browser.
2020 Kia E-Niro VESS/Reverse Chime defeat solution
- Thread starter ENirogus
- Start date
- Replies 208
- Views 131K
Josh Schneider
New Member
Thanks to everyone who's posted these instructions and follow-ups.Here's another success story: the backup chime was my least favorite thing about my new Niro, but with the instructions above I was able to install the switch in about 90 minutes. Huge thanks to ENirogus for figuring this out, Cory LaFountaine for clarifying how the wiring matches up and 3XG for posting additional photos of the disassembly process. Here are some more tips:
- I ordered these connectors from Amazon because it was a smaller quantity: https://www.amazon.com/dp/B081PVPZZM. I thought the colors were arbitrary, but they actually correspond to different wire thicknesses. The 10-12 gauge size was clearly too big, but I erred on the large side and tried the 14-16 gauge size because I didn't want to risk breaking a wire. But that was still too large to make contact and the switch didn't do anything on my first attempt. I tried again with the 18-22 gauge (red) connectors, and pulled the wire deeper into its slot after clamping it shut, and that worked.
- I used this switch mentioned above: https://www.amazon.com/dp/B07GTJBR59. It doesn't feel too big to me; I like that it can be unplugged from the wiring, so I can more easily mount it later; and the red light coordinates with the rest of the panel buttons. The downside is that the wires aren't very long and it just barely reaches down to the fuse box cover. I haven't drilled a hole to mount it yet, but I think it will be long enough to go into the top portion of the cover.
- With that LED switch, two of the switch wires need to go to the black wire in the car, but there's not enough room for two clips on the same wire. There are two black wires on the car plug, and I confirmed from the schematic posted above that both are ground, so I clipped one switch wire to each. I just now realized that I could have twisted the two switch wires together and put them into the same connector, which would have been easier and less bulky than using two connectors.
I basically followed these instructions, because I have the same switch. I used very small versions (20-22 gauge) of the screw-type taps listed in the detailed post. Thanks to these instructions (particularly the part about both black and green -- I think / hope -- needing to go to ground, and I did this with another tap, instead of to a chassis grounding point), the switch works as intended. On the downside, I have no LED indicating whether the switch is on or off.
I guess my 2 questions are 1) how would I know if the LED on the switch is bad (e.g. can I test it with a battery) or 2) would it just be that the red/pink connection might be bad if the switch is OK and I'm getting the intended functionality?
To be totally clear, I'm using the stock switch harness, black + green to ground on the car's harness (black wire), red to pink (power) on the car's harness, and blue to blue/black on the car's harness. The yellow wire from the switch harness is not connected to anything.
Appreciate any help.
As an Amazon Associate we earn from qualifying purchases.
Josh Schneider
New Member
I guess my 2 questions are 1) how would I know if the LED on the switch is bad (e.g. can I test it with a battery) or 2) would it just be that the red/pink connection might be bad if the switch is OK and I'm getting the intended functionality?
Well, odd follow-up. First, someone broke into our new Niro, smashing the driver's window and pulling out the power button. TikTok Kia Boys, didn't know that they couldn't just hotwire this particular car.
After cleaning things up and getting the marred power button back in place (usable until we get a new one), I started the car and suddenly found the light was working on my VESS override button. Now it's exactly as described in other's posts. I'm pretty much positive this change is coincidental, and might have to do with one of those posi-taps sinking into a wire after a day or so, but

I actually posted that question tonight to Eric who did the benchtop video of VESS and the canbus scripts he had.Anyone considered disabling the “reverse” signal to the VESS unit so that it only makes the “spaceship” sound (no beep) when forward and reverse?
Since the reverse signal is close by in the drivers footwell, the simplest way is to devise a circuit that drives its output low[gnd] for say one second when you shift into reverse, then does the same when you shift out again. You could also retain the button for tight parking lots etc
Just slightly beyond my meager electronics skills
Just slightly beyond my meager electronics skills
This seems like something that could be done pretty easily with a small microcontroller like ESP32 or ESP8266 running ESPHome, which is a simple way to run arbitrary logic based on things like various inputs/outputs going high/low. It also supports modbus, if that's helpful/necessary.
My Niro is from 2019, so it doesn't have the obnoxious backup alarm, so I'm probably not going to work on this myself.
My Niro is from 2019, so it doesn't have the obnoxious backup alarm, so I'm probably not going to work on this myself.
rcnesneg
Member
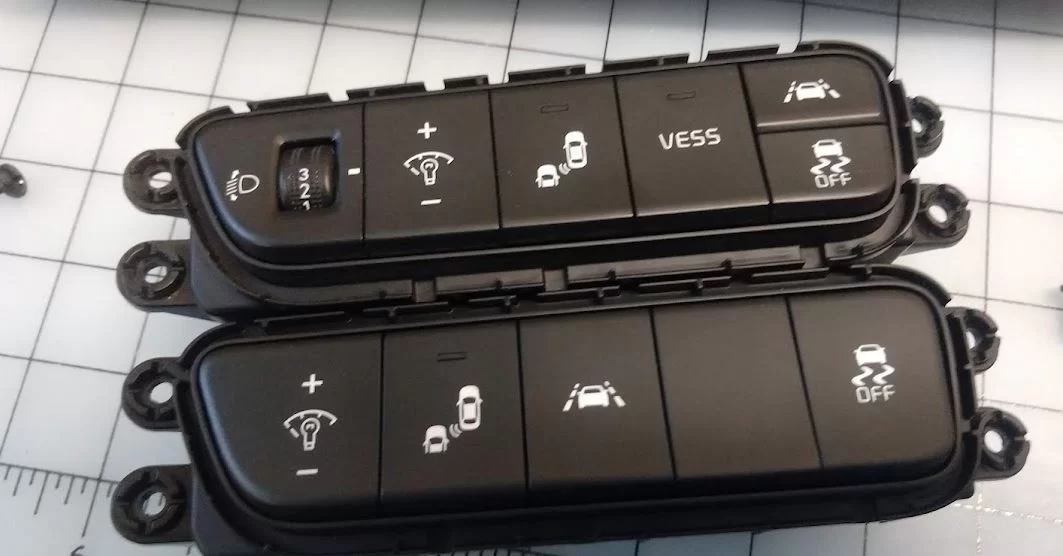
Has anyone tried to buy and change the light and traction pannel with one that also has the VESS button?
Yes they are plug and play with no changes to wiring or anything, even if buttons are in a different place. See post #143. The hard part is finding one.
Thank you! I have found that part at a local Kia service, but I wasn't sure it works. As soon as I will buy it, I will put here part no.Yes they are plug and play with no changes to wiring or anything, even if buttons are in a different place. See post #143. The hard part is finding one.
Thanks!
Cory LaFountaine
Member
Thank you! I have found that part at a local Kia service, but I wasn't sure it works. As soon as I will buy it, I will put here part no.
Thanks!
Following! Let us know how it works!!
Sent from my iPhone using Inside EVs
rcnesneg
Member
Thank you! I have found that part at a local Kia service, but I wasn't sure it works. As soon as I will buy it, I will put here part no.
Thanks!
I'm surprised they have it - depending on where you are? I've heard of US owners ordering them from wrecked cars via proxy buyers in Europe and having a really hard time finding or getting them, usually costing more than $100 for the switch panel out of a wrecked car.
I've got a VIN with VESS and I have ordered on local service. I can't wait to grab it...I'm surprised they have it - depending on where you are? I've heard of US owners ordering them from wrecked cars via proxy buyers in Europe and having a really hard time finding or getting them, usually costing more than $100 for the switch panel out of a wrecked car.
")
It's cost is 200$

Could you provide the part number? TIA.I've got a VIN with VESS and I have ordered on local service. I can't wait to grab it...
It's cost is 200$
Part No is 93700G5FH0WKCould you provide the part number? TIA.
It fit and work just perfect. Just plug and play
")