What did you do to your MINI today?

Something that always bothered me is the passenger side mirror doesn’t dim (only the center and driver.) This wasn’t always the case so I found a passenger mirror controller with dimming+heating+tilt+fold and swapped it into my original mirror. I already had dimmable glass all around. Just finished up and amazingly it “just worked” without any coding.

I originally was going to run a wire from left to right, just a simple tap, but that’s really janky. Then I thought I’d just use an existing mirror assembly with all the features, but they removed passenger dimming before redesigning the housing. Left and right would have been different and the mirror caps aren’t interchangeable. Ultimately transplant was the only way.
Please tell me more!!! This has been driving me mad since I got my SE... would love to do this as well. Will take anything you're able to share... part number(s), pics of the process, etc. Thanks!
 
Please tell me more!!!
Let me preface by saying this is how I did it and haven’t seen or found another way. You may come up with another idea, part, or process that is cheaper or better.

As mentioned you need electronics harvested from an older mirror. Part #51167401098 contains heat, dim, auto fold, tilt, memory - pretty much every feature. There may be others as well. It’s an older one so you may be able to find in a junk yard, eBay, and they still sell new. I was not able to find just the electronics needed (though some BMW models do sell it separately, so there may be a tiny chance it exists.)

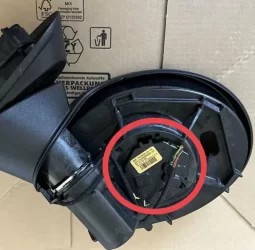
The basic process is to remove the existing mirror glass, cap, and housing from the vehicle. Transplant the electronics by unclipping the flat controller (see picture for the part I am talking about.) It has 4 sets of wires (input, heat, dim, fold) and a hidden press fit connector. Once you pry the retaining clips it more or less comes out easy. Then you press in the donor controller and solder the wires I mention next.

The only snag was, I couldn’t figure out how to safely remove the white+yellow wire for the fold motor. Everything seems water tight and hard to take apart. I ended up snipping and soldering that connection, the rest remain intact and cleanly work.

Finally you need dimming glass. I installed on day one as part of “euro mirror” kit and don’t recall exactly which part #. It is apparent by the perimeter etching.

743ABD5A-F687-4404-B995-4960B9FDCA40.webp
 
Very very cool mod.

The European “blind spot” mirror glass (from ECS or wherever) is “dimming” on both sides?
 
Very very cool mod.

The European “blind spot” mirror glass (from ECS or wherever) is “dimming” on both sides?
They are a couple of variants, but the ECS kit I got has dimming on both sides. The passenger is #51167366046, aspheric with no disclaimer. #51167366050 might be the official North American dimming passenger since it’s convex with the reminder.
 
I like to stay visible, so tint would mean brighter bulbs to compensate for me. But at least they aren't blacked out brake lights...
Mine are plenty visible through dark vinyl tint with the stock lights. Just an FYI in case you think about switching...
 
Let me preface by saying this is how I did it and haven’t seen or found another way. You may come up with another idea, part, or process that is cheaper or better.

As mentioned you need electronics harvested from an older mirror. Part #51167401098 contains heat, dim, auto fold, tilt, memory - pretty much every feature. There may be others as well. It’s an older one so you may be able to find in a junk yard, eBay, and they still sell new. I was not able to find just the electronics needed (though some BMW models do sell it separately, so there may be a tiny chance it exists.)

The basic process is to remove the existing mirror glass, cap, and housing from the vehicle. Transplant the electronics by unclipping the flat controller (see picture for the part I am talking about.) It has 4 sets of wires (input, heat, dim, fold) and a hidden press fit connector. Once you pry the retaining clips it more or less comes out easy. Then you press in the donor controller and solder the wires I mention next.

The only snag was, I couldn’t figure out how to safely remove the white+yellow wire for the fold motor. Everything seems water tight and hard to take apart. I ended up snipping and soldering that connection, the rest remain intact and cleanly work.

Finally you need dimming glass. I installed on day one as part of “euro mirror” kit and don’t recall exactly which part #. It is apparent by the perimeter etching.

View attachment 19991
Thanks for taking the time to write all that out, super helpful! Did you have to do any programming or was it just plug-and-play?
 
Usually when I tackle things I don’t have time or I don’t remember to take pictures. Did you manage to get any other pictures of the process? Or when you do have a chance, could you possibly do a write up for the steps involved including how to remove the mirror housing from the car? I appreciate all the info you’ve given so far. It looks like one of those “I’d like to do this eventually” mods.

ETA: [facepalm] I always tell people “GIYF” and I didn’t bother to google this. Just two little torx screws? Huh.
 
Last edited:
Just installed a wireless charging pad where the 12v and USB ports are located on the lower dash. I paid around $75 ($68.50 + tax) for it on Amazon.

Overall, the install succeeded, but I encountered three issues:
  • On the new wiring harness, the part that the old lighter/12V plug inserts into to wouldn't accept the connector from the Mini. The plug orientation matched, just it was a wee bit too small to accept the power plug from the Mini. I'm guessing the fitting shrank after being formed or they didn't size the plug correctly (you get what you pay for). I ended up using an exacto knife to trim away a bit of the inner wall from the connector on the wiring harness to make it more accepting of the plug. After some shaving and some forceful persuasion, I was able to finally shove the power plug into the new harness.
  • My '23 SE had two USB ports: one USB-C port, and one USB-A port. However, the removable rectangular portion that transferred to the new panel only contained the USB-C portion; the USB-A port was a completely separate connector. I haven't used either port yet, so I just taped up the USB-A port and shoved it into the void, while the USB-C port went into the new panel (though it only went in "upside-down" with the battery facing downward). I didn't want to risk ruining the panel trying to cut open a hole for the USB-A port, so I'm actually down 1 USB port after the install. Hopefully the USB-C port is the one that does data transfer as well, otherwise I'll need to pull open the panel again if I ever need to access the USB-A port for software updates in the future.
  • One other thing was that I didn't bother trying to transfer was the existing 12V/lighter socket, which the new housing had a space for. Instead, I bought a replacement socket from eBay and used that instead, leaving the old 12V unplugged and hidden behind the new housing. One problem was that the housing didn't have any place for the clips from the 12V socket to secure into, so it would just slide out. To fix this, I just shoved a ziptie through some notches at the back of the socket to "lock" it into place and wrapped a little bit of electrical tape around the outer diameter of the socket to fill in some tolerance and prevent rattling.

Here's what the finished install looks like:
View attachment 19528 View attachment 19529

Another thing I did today was use BimmerCode for the first time to unlock the acoustic pedestrian warning toggle. I got a little worried after seeing all the warnings in the app regarding the coding process, but everything went fine. Now I can toggle the warning sound on/off with one of my shortcut buttons!
I finally received mine from AliExpress the other day, it came out to $86 Canadian. Actually it didn’t take too long overall, maybe three weeks.

As soon as I brought my car back from the collision center, I popped out the 12V/USB module and began trying to figure out what’s next.

First was transferring the clips to the new module. Luckily, I remembered seeing a video from a couple of years ago by Ben Rolfe, otherwise I’d not have known to swap them over.

The USB-C module was easy enough to figure out, and when I re-watched Ben’s video it was, like, duh.

On the other hand, the 12V (“lighter”) socket was a puzzler. It was a bit of work for my mildly arthritic fingers to prise the power cable off the hidden end, but I eventually managed. However I couldn’t quite figure out how to remove the socket to install in the panel’s empty space. I briefly considered just leaving the new hole empty and finding an o-ring to friction fit the 12V socket’s cover, but that’s even too half-arsed for a lazy prick like me. I don’t have a 12V socket handy, and a limited amount of searching online led me to a few that looked “standard enough” that they might fit, but now I’d be into this for another 20 or 30 dollars and that seemed kind of silly. I finally came across a video that showed how to re/re the existing socket, and with a bit of patience I got it done without any cursing or tears. I thought I was home free, but got tripped up by the same issue as @inferno10: the 12V plug on the new part’s pigtail doesn’t mate with the socket on the car’s harness. I began shaving away at it with an Xacto knife, but the timer was about to go off on my Dr. Ooker pizza in the oven and I decided to take a break. I’ll update in my next post.
 
Last edited:
…Every trip back from the workbench to the car was hope followed by exasperation. I kept shaving and squeezing and shaving and squeezing. When I finally got the tip in [hehe hehe] I decided to go big, got out the Knipex pliers and went at it. When I thought it was seated, I plugged everything else in and hit the Start toggle. Blue LED! Stuffed all the wires in the hole, lined it up, popped it in, and dropped my phone on. BOOM! Charging!

Tomorrow I’ll see if my phone heats up. But a 12 Pro Max in a Spigen shield just barely fits on the shelf, so I’m wondering how well centered the phone is, front to back.

Also, the area under the shelf is now almost unusable. It’ll be a struggle to plug in USB¢ or any sort of 12V adapter. On the bright side, it’ll hide my parking and tollway transponders (I don’t want them adhered to my ceramic-tinted windshield).
 
This was my small project for the day. Kinda bugged me that the door handles weren't complete chrome rings... so I changed the front half! Part number is 51417419649 for both sides.

View attachment 20001 View attachment 20002 View attachment 20003
View attachment 20004
I hadn't even noticed that they weren't full chrome. It doesn't bother me (well, at least it didn't... now thanks to you, it might! ), but I admire your attention to detail and effort to make your MINI yours.

Now here is my question: WHY aren't they fully chrome, when the part is available? Is that an upgrade as you go from level 1 (no chrome) to level 2 (half chrome) to level 3 (full chrome) trim, or something? (A bit of insightman-style facetiousness here.) Really, it makes no sense to me.
The chrome version of the part is more complex, and therefor more expensive. Not by much, but when you multiply it out by tens of thousands of vehicles it can add up to a meaningful sum across a single model. It's a practice known as 'decontenting'.
 
The chrome version of the part is more complex, and therefor more expensive. Not by much, but when you multiply it out by tens of thousands of vehicles it can add up to a meaningful sum across a single model. It's a practice known as 'decontenting'.

Ah. So it used to be full chrome, but now it's not?

Could always go full bling!

https://www.ebay.com/itm/275609307810

(Geez, I seem to have wandered down quite the rabbit hole - never realized how many different bits are out there for customizing cars )
 
Last edited:
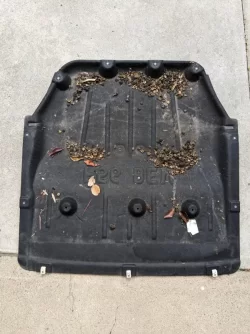
Not really a mod, but I did clean the front splashguard b/c I saw leaves stuck in the front grille. Looks like my Mini was storing some stuff for the winter..lol
 

Attachments

  • PXL_20230318_192347076.webp
    PXL_20230318_192347076.webp
    135 KB · Views: 27
AliExpress Wireless Qi Charging Tray report number 1: in my case it’s a bit hit-and-miss; my iPhone 12 Pro Max with a thin Spigen case barely fits on the shelf, and takes some finesse to align “just right” to initiate a charge. More than once today, I’ve dropped my phone on it and thought it was centered, only to notice a while later the battery icon on the CarPlay UI was white (ie. not charging), and looking down noticed the error flash of the shelf’s LED.

IMG_2943.webp

I have no way of knowing how well I’ve centered the phone when it does initiate the charge, so no idea how (in)efficiently it is charging. I haven’t noticed my phone heating up any more than it does on my various 10+ Watt Qi chargers at home and at work (RavPower, Aukey and Anker, all solid brands).

I’ll make a note of the initial SoC and time on my next long drive on Tuesday, to see how fast it might be and to compare it with the fast chargers at home.

ETA: lol I had to take that pic with a pretty old basic iPad. Sorry about the quality.
 
Last edited:
Back
Top