KentuckyKen
Well-Known Member
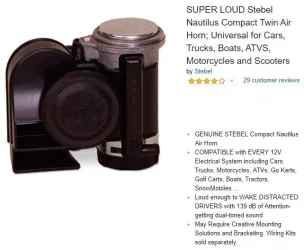
I got tired of the wimpy horn and saw a YouTube video on some guys startling unsuspecting people with a diesel train air horn. A little Googling found a real diesel train sounding air horn was way too expensive and took up too much room but I found a single air horn for $35 on eBay. And boy is it loud!
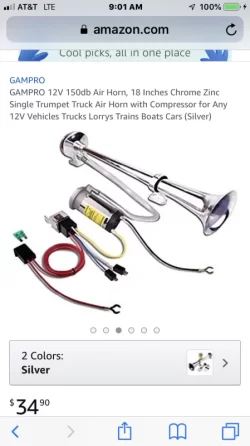
There’s a lot of cheap crap from China, but this one seemed of decent quality (all metal air pump) and came with a relay and fuse for plug and play installation. It was easy peasy by ordering the horn adapter from Honda that plugs into one horn connectors and adapts it to 2 spade lugs. No soldering at all; just wire it in place of one of the horns using the Honda adapter and run the fused wire to the pos battery terminal and the neg wire to a ground. And all the spade lugs in the horn kit are silicone covered. I went over board and used plastic wire loom on the wire going to the battery. I also used zip ties on the friction fit of the hose to the horn and pump.
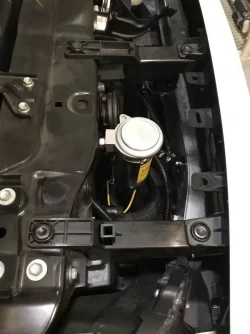
By removing the left horn, I was able to use a carriage bolt and nut to secure the pump in the same threaded hole the left horn came from and zip tied the relay to a plastic frame member.
The horn was a little trickier to get installed. I used a right angled drill to reach in front of the radiators and drill 3 small holes to mount the horn on the aluminum frame member that runs across the front. Not much room there but it can be done if your arms aren’t too big.
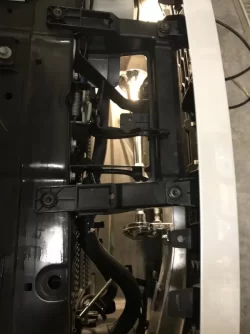
To start, you have to remove the black plastic trim that covers the area between the radiators and the front body panel. To get to that you remove a trim piece that holds down the air intake and then move the air intake back. All the fasteners are the pop up button cap kind (or whatever you call them). You can buy a tool for $6 or just carefully use a screwdriver to pry the cap up. Then lift up the large cover that will now be held on just at the bumper side by some friction plugs. Then it’s just mounting the horn in a hard to reach area, hooking everything up, fishing the fused wire over to the battery and finding a good ground for the neg wire. Fortunately the pos battery terminal has a separate bolt under the plastic cover just made for this.
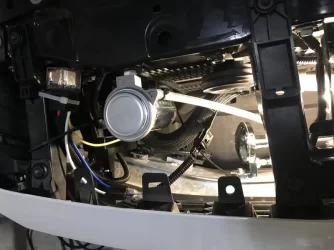
This shows the pump to the left of the other horn and the relay zip tied to the frame at left. Fearing corrosion, I sealed the bottom part of the relay where the wires enter with some silicone caulk. The top clear part houses the actual relay components and is replaceable.
I ended up mangling two of the plastic fasteners and ordered a whole box of assorted ones from eBay for what two would cost from Honda. I’ll be happy to send a couple to whoever needs them.
I also got lucky and had a couple of short carriage bolts that fit the threaded hole for the horn and the fitting on the pump, and can send one out if you can’t find one and a nut from the hardware store.
The only trick I found was identifying the pos vs. neg horn contacts. I did that with my trusty cheap and free Harbor Freight VOM. Just mark the one that shows continuity to the neg battery terminal after plugging in the adapter. Then just plug in all the spade connectors according to the instructions.
As a side note, this exposed the HV battery system coolant expansion tank (page 480) that some have speculated takes some special dielectric coolant since it goes to the battery pack. Well, it has the same color and smell as the fluid in the other two expansion tanks, so I think it’s just regular old Honda long life coolant type 2.
Also I noticed the radar has a screw adjustment for up and down just like headlights but seems to use shims for L to R.
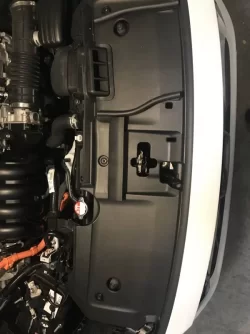
Here is the cover back on and you can’t tell it was ever off.
If anyone wants to try this they can PM me with any questions and I’d be happy to walk them through it over the phone. Except for installing the large air trumpet in a hard to reach area, it’s really quick and easy. And I took a ton of pictures if anyone needs them.
My Clarity may not get any name recognition but when I blow the horn now, it gets the respect and attention this car deserves!
I am Clarity, hear me roar!!!
And make way for my mighty fusion (solar PV) powered car, you pathetic Dino fueled smog belching weenies!
PS: The electrical hookup caused a hard reset with all the warning lights and I had to recalibrate the TPMS after it reinitialized. Also, I lost the driving history so my EV range estimate went from mid 60s to mid 40s. However, the efficiency as tracked by kWh/mile did not change. With 4 days of driving and o/n charging the EV range estimate is only up to 59 miles. So it looks like it will take at least 5 charge cycles with ~20-25 miles each to return to its usual accuracy. And my HV range estimate increased by a few miles with out adding any gas. But at least the reset didn’t lose any of my settings and now all is back to normal.

There’s a lot of cheap crap from China, but this one seemed of decent quality (all metal air pump) and came with a relay and fuse for plug and play installation. It was easy peasy by ordering the horn adapter from Honda that plugs into one horn connectors and adapts it to 2 spade lugs. No soldering at all; just wire it in place of one of the horns using the Honda adapter and run the fused wire to the pos battery terminal and the neg wire to a ground. And all the spade lugs in the horn kit are silicone covered. I went over board and used plastic wire loom on the wire going to the battery. I also used zip ties on the friction fit of the hose to the horn and pump.
By removing the left horn, I was able to use a carriage bolt and nut to secure the pump in the same threaded hole the left horn came from and zip tied the relay to a plastic frame member.

The horn was a little trickier to get installed. I used a right angled drill to reach in front of the radiators and drill 3 small holes to mount the horn on the aluminum frame member that runs across the front. Not much room there but it can be done if your arms aren’t too big.

To start, you have to remove the black plastic trim that covers the area between the radiators and the front body panel. To get to that you remove a trim piece that holds down the air intake and then move the air intake back. All the fasteners are the pop up button cap kind (or whatever you call them). You can buy a tool for $6 or just carefully use a screwdriver to pry the cap up. Then lift up the large cover that will now be held on just at the bumper side by some friction plugs. Then it’s just mounting the horn in a hard to reach area, hooking everything up, fishing the fused wire over to the battery and finding a good ground for the neg wire. Fortunately the pos battery terminal has a separate bolt under the plastic cover just made for this.
This shows the pump to the left of the other horn and the relay zip tied to the frame at left. Fearing corrosion, I sealed the bottom part of the relay where the wires enter with some silicone caulk. The top clear part houses the actual relay components and is replaceable.

I ended up mangling two of the plastic fasteners and ordered a whole box of assorted ones from eBay for what two would cost from Honda. I’ll be happy to send a couple to whoever needs them.
I also got lucky and had a couple of short carriage bolts that fit the threaded hole for the horn and the fitting on the pump, and can send one out if you can’t find one and a nut from the hardware store.
The only trick I found was identifying the pos vs. neg horn contacts. I did that with my trusty cheap and free Harbor Freight VOM. Just mark the one that shows continuity to the neg battery terminal after plugging in the adapter. Then just plug in all the spade connectors according to the instructions.
As a side note, this exposed the HV battery system coolant expansion tank (page 480) that some have speculated takes some special dielectric coolant since it goes to the battery pack. Well, it has the same color and smell as the fluid in the other two expansion tanks, so I think it’s just regular old Honda long life coolant type 2.
Also I noticed the radar has a screw adjustment for up and down just like headlights but seems to use shims for L to R.
Here is the cover back on and you can’t tell it was ever off.

If anyone wants to try this they can PM me with any questions and I’d be happy to walk them through it over the phone. Except for installing the large air trumpet in a hard to reach area, it’s really quick and easy. And I took a ton of pictures if anyone needs them.
My Clarity may not get any name recognition but when I blow the horn now, it gets the respect and attention this car deserves!
I am Clarity, hear me roar!!!
And make way for my mighty fusion (solar PV) powered car, you pathetic Dino fueled smog belching weenies!
PS: The electrical hookup caused a hard reset with all the warning lights and I had to recalibrate the TPMS after it reinitialized. Also, I lost the driving history so my EV range estimate went from mid 60s to mid 40s. However, the efficiency as tracked by kWh/mile did not change. With 4 days of driving and o/n charging the EV range estimate is only up to 59 miles. So it looks like it will take at least 5 charge cycles with ~20-25 miles each to return to its usual accuracy. And my HV range estimate increased by a few miles with out adding any gas. But at least the reset didn’t lose any of my settings and now all is back to normal.
Last edited:
