I find without the ACTIVE feature applied it reacts like the first original arcade game- PongLane keep assist doesn't wobble here.
You are using an out of date browser. It may not display this or other websites correctly.
You should upgrade or use an alternative browser.
You should upgrade or use an alternative browser.
Modifications and Tweaks
- Thread starter electriceddy
- Start date
- Replies 294
- Views 118K
hwitten
Active Member
Tried todayFINALLY after 1.5 years added the VESS switch (like the European models). No need to pull the dash apart as you can do this thru the fuse panel door.
I would first like to thank mikeselectricstuff and KiwiMe for the schematics and helpful posts to get this accomplished.
So here we go: Begin by removing the connecting plug from the switch panel left side of steering wheel - low (push the interlock tab and pull out plug ) then pull enough cable to work with.
")
Could not get the connector loose. Fingers too Phat it seems. Going to try again another day.
Its in there pretty tight, but if you rock it side to side while pressing the tab it comes out pretty easily, also goes back in easier that way as well.Tried today
Could not get the connector loose. Fingers too Phat it seems. Going to try again another day.
hwitten
Active Member
Tried again... no luck yetIts in there pretty tight, but if you rock it side to side while pressing the tab it comes out pretty easily, also goes back in easier that way as well.

Just to confirm, the release tab on bottom gets pushed against the connector body?

hwitten
Active Member
Thank you. Confirms my thinking. Sure is tight in there... plug and spaceThis is what it looks like close up. Squeeze against the plug body and wiggle. Of course I haven't done this myself ...!
View attachment 8940
That is the part I squeeze with my right thumb while pulling the harness/connector from side to side. I do scrape a knuckle a bit on the fuses but with a glove on it would make things a lot more difficult. To reinstall after the lead soldering, I turn my hand around and push it back in while feeling the socket as a guide. Just went out and tried it ... no problem.This is what it looks like close up. Squeeze against the plug body and wiggle. Of course I haven't done this myself ...!
View attachment 8940
")
I discovered a cheap and simple sound isolation solution by accident. I ordered a windshield sealing strip to conceal some wiring running inside the dashboard gap. I then proceeded to install it and didn’t think much about it. As usual I would drive with my windows closed inside my basement carpark but suddenly I could barely hear the VESS. I thought I had accidentally switched the VESS off. It only occurred to me later that the rubber strip has effectively isolated most external noises that comes in into the cabin through the dashboard gap from the firewall.
I attach links to two typical advertisements I see online (slightly different design). Online price seems to vary wildly but I bought mine from a local online shop at a fraction of the price shown on Ebay or Aliexpress...including shipping.
So low cost solution yet effective. Pleasantly surprised.
https://www.ebay.com/itm/63-Rubber-...009665?hash=item4da45c8941:g:mvsAAOSwqzFeFJvL
https://www.ebay.com/itm/Car-Anti-d...416230?hash=item3d6d291de6:g:GagAAOSwkE9bUDnB
(disclaimer - I did not buy mine from the two links shown)
Last edited:
apu
Well-Known Member
Yeah it pretty tight, last time I was in there it was easier to loosen the front bumper fascia. I just took the 3 bolts at the rad support off and single screw and 2 plastic fasteners at each front wheel well, you can then just gently pull on each corner of the bumper free if its body support fastener and it will slip forward. I left the bottom bumper fascia fasteners in place as I didn't want to remove the bumper completely just moved it forward enough to get the hands in at a better angle.Tried today
Could not get the connector loose. Fingers too Phat it seems. Going to try again another day.
hwitten
Active Member
Well... the more lack of success the more determined this ol' fart got. It took a headlamp, long screwdriver, plastic tool and being somewhat of a contortionist to finally get the plug out.That is the part I squeeze with my right thumb while pulling the harness/connector from side to side. I do scrape a knuckle a bit on the fuses but with a glove on it would make things a lot more difficult. To reinstall after the lead soldering, I turn my hand around and push it back in while feeling the socket as a guide. Just went out and tried it ... no problem.
Now for the mod. Please see the attached image to confirm I have it right. /Thank you.
Attachments
Almost there... according to this diagram:Well... the more lack of success the more determined this ol' fart got. It took a headlamp, long screwdriver, plastic tool and being somewhat of a contortionist to finally get the plug out.
Now for the mod. Please see the attached image to confirm I have it right. /Thank you.
https://insideevsforum.com/communit...-virtual-engine-sound-system.5821/#post-67494
Pin 7 (tab side counting left from plug) is green and correct, I have not metered out the ground on pin 12 (black), but it should work. I grounded mine to the chassis. (through the switched 200 ohm resistor of course)
Wrong connector, hwitten is referring to the one to the switch assy left under the dash. Both however are equally hard to get to. But if you have easy access to the connector behind the rad, you would use pin 3 (also green) and run a wire to the cabin to pick up the switch and resistor:Yeah it pretty tight, last time I was in there it was easier to loosen the front bumper fascia. I just took the 3 bolts at the rad support off and single screw and 2 plastic fasteners at each front wheel well, you can then just gently pull on each corner of the bumper free if its body support fastener and it will slip forward. I left the bottom bumper fascia fasteners in place as I didn't want to remove the bumper completely just moved it forward enough to get the hands in at a better angle.

Thanks to mikeselectricstuff for this similar diagram.
apu
Well-Known Member
Ah, thanks for the correction.Wrong connector, hwitten is referring to the one to the switch assy left under the dash. Both however are equally hard to get to. But if you have easy access to the connector behind the rad, you would use pin 3 (also green) and run a wire to the cabin to pick up the switch and resistor:
Thanks to mikeselectricstuff for this similar diagram.
Good point, I guess I should have included this diagram as well in case someone decides to approach this from the front connector to the VESS boxYou'll note that the schematic is simplified and omits the resistor in series with the switch.
https://insideevsforum.com/communit...al-engine-sound-system.5821/page-2#post-67628
hwitten
Active Member
The deed is done... checked pin 12 to make sure it went to ground. Used "T" connectors to tap into green(7) and black(12). Built a little harness that had switch on one end, insulated spade connectors on the other with a 220 ohm resistor soldered into one wire and shrink-wrapped. Spade connectors plugged into "T" connectors. All good. No holes needed. Works great. VSS is powered on at each start. Press button, silence. Press again and VSS active again.Almost there... according to this diagram:
https://insideevsforum.com/communit...-virtual-engine-sound-system.5821/#post-67494
Pin 7 (tab side counting left from plug) is green and correct, I have not metered out the ground on pin 12 (black), but it should work. I grounded mine to the chassis. (through the switched 200 ohm resistor of course)
Was not quite as easy-peasy as anticipated due to the close quarters and phat hands but at the end it all worked out. Actually better than when I first posted the question because it is now on by default until I'm in a place where silence is golden.
Great forum co-operation. Thank you all.


I knew you could do it, if I can get my Dupuytrens Contracture six time operation - (going on 7) hands in there then anyone can. Neat job, and if I did it again I would make use of those tap connectorsThe deed is done... checked pin 12 to make sure it went to ground. Used "T" connectors to tap into green(7) and black(12). Built a little harness that had switch on one end, insulated spade connectors on the other with a 220 ohm resistor soldered into one wire and shrink-wrapped. Spade connectors plugged into "T" connectors. All good. No holes needed. Works great. VSS is powered on at each start. Press button, silence. Press again and VSS active again.
Was not quite as easy-peasy as anticipated due to the close quarters and phat hands but at the end it all worked out. Actually better than when I first posted the question because it is now on by default until I'm in a place where silence is golden.
Great forum co-operation. Thank you all.
View attachment 8945 View attachment 8946 View attachment 8947
navguy12
Well-Known Member
That momentary switch you used, do you have a link to that...or is it an over the counter item at Napa/CT/Home Depot?FINALLY after 1.5 years added the VESS switch (like the European models). No need to pull the dash apart as you can do this thru the fuse panel door.
I would first like to thank mikeselectricstuff and KiwiMe for the schematics and helpful posts to get this accomplished.
So here we go: Begin by removing the connecting plug from the switch panel left side of steering wheel - low (push the interlock tab and pull out plug ) then pull enough cable to work with.
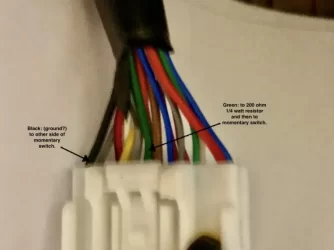
First image shows the proper wire to tap on to, pin 7 of the connector to the switch assembly, green wire - make sure to count from the tab side of the connector.

Next strip a small bit of insulation and solder a 24 AWG stranded about 18 inches long to the green wire, I kept the original green wire maintaining contact with connector (just in case). Not shown is the 200 ohm 1/4 watt resistor which is soldered on that new lead and heat shrink applied, basically new wire lead consists of (9 inches wire, then heat shrink resistor then 9 inches more wire)

Next use some good quality tape (scotch super 33 works well) and wrap around the soldered connection and continue the wrap up the existing sleeve for strain relief.

This is the momentary contact switch I selected - note it has a shaft about 5/8 inch long which will come in handy later. I crimped the wires with loops on the switch and on the lead that goes to ground connection (the one flagged with tape will be going to ground).

Next find a good ground to connect the lead off the other side of the switch - I chose a handy screw holding some module close to the area

Last is to mount the switch. The spot I picked is below the steering column on the right side. The material (plastic) is quite thick there so the longer shaft on the switch I picked works perfectly flush. I might advise to remove the insulation first behind the panel as it wraps around the drill bitNo worry I tucked it back up and all is good.

The operation works really well. The VESS comes on every time you start the car and can be silenced with a momentary push of the button. It can be switched on or off as you desire while in gear and driving as well. I liked the idea of the silence but the problem with pulling the plug at the front of the car is there is times when you do need it ie: backing up in a parking lot etc. This way you can leave it on in that situation and shut it off when you go forward if safe to do so.
Enjoy this mod and sorry it took me so long to come up with this.
Slogging thru Google is only giving me examples of short length units with back lighting. Thanks.