Modifications and Tweaks

With the sloppy driving conditions of late, I notice my rear camera lens is always mucked up with grime. I did a little searching, and found a fellow who managed to install a rear camera washer in his Ioniq. (https://www.ioniqforum.com/threads/rear-view-camera-washer.35595/)

He didn’t have a rear washer or wiper, unlike the Kona, so I figured it shouldn’t be that hard to install a second washer nozzle on my car. I headed to Napa and picked up a 3/16” straight washer hose connector, a 3/16” Y connector, 8 feet of washer hose, and a check valve. Total cost $25. Then I picked up 2 (1 for a spare) 18 gauge needles from the pharmacy ($3). As it turns out the Napa check valve didn’t work after first installation and testing. :mad: I ended up ordering and using a Kona stock rear washer check valve (Hyundai p/n: 9888629000) from the dealer for $7.

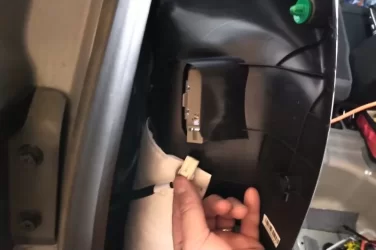
On the rear hatch door, I popped off the top interior trim, the door handle insert, and then the bottom trim panel (there is 1 plastic screw to remove at the bottom), and unscrewed and popped off the side trim panel on the passenger side. Everything is held with standard vehicle push in plastic connectors. Next, I undid the four 10mm nuts holding the rear latch assembly and squeezed the 2 orange plastic pop-in connectors to remove the assembly. There is one electrical connector to disconnect that feeds the camera, license lights and the latch release button.
01_Interior Dissambly.webp
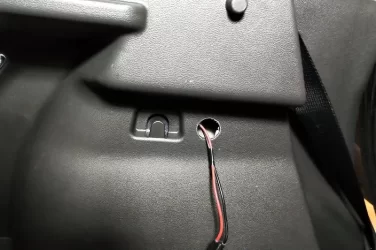
The wires feed through a rubber grommet that pops out, enabling the assembly to be placed on the bench.
02_Latch Assembly.webp

From the inside of the latch assembly, centered on the camera lens, I drilled a 1/16” hole through the plastic to insert the needle nozzle. Then, clipped the needle’s plastic flange so it would fit inside the washer hose, and then used a Dremel to cut the needle to length, and rounded the edges. I bent the needle slightly so it stays close to the lens and would spray on it. (This was the fiddliest bit of the whole process; I blew water through the hose and needle a few times until I was happy. Rubber washer hose water doesn’t taste good, by the way….). The nozzle is close enough to the camera that you don’t snag on it.
03_Drill 3-16 hole.webp
04_Needle shaped.webp
I secured the needle and hose under the camera, then rerouted the camera cable to make room for the washer hose over to the grommet. I poked a new hole in the grommet, and squeezed the hose through, taping the wire and hose together with electrical tape. The grommet seal is tight to the washer hose. Then I cut the hose in the latch assembly and inserted (on the second attempt) the Hyundai check valve (white side towards the nozzle). This basically prevents the hose from draining when the washer pump is not pushing fluid.
05_Installed With Check.webp
I reinstalled the rubber grommet and latch assembly and then cut the hose to insert a straight 3/16” hose connector, so that in the future the latch assembly could be removed by disconnecting the electrical plug and decoupling this fitting.06_stright grammet.webp
I ran the hose above the tail light, then between the metal and the plastic trim to the top of the window.
07_Routing.webp
There, I disconnected the original check valve for the top sprayer, and made up a Y to divert the washer fluid to both nozzles. The top check valve is closest to the sprayer, and the Y permits unrestricted flow to the camera check valve.
08_Y Valve.webp

I tested the installation, and when activating the rear washer, it sprays well on both nozzles. I took a quick drive to ensure the moving air didn’t suck out the fluid, and then reinstalled all the interior trim. Overall, I’m pleased with the install, and the nozzle is not noticeable unless you look for it.

Hope this helps anyone looking to try a similar project!
09_Installed.webp
 

Attachments

Looks slick, I might have to do this.
I see your fm NB, what kind of range are you getting?


With the sloppy driving conditions of late, I notice my rear camera lens is always mucked up with grime. I did a little searching, and found a fellow who managed to install a rear camera washer in his Ioniq. (https://www.ioniqforum.com/threads/rear-view-camera-washer.35595/)

He didn’t have a rear washer or wiper, unlike the Kona, so I figured it shouldn’t be that hard to install a second washer nozzle on my car. I headed to Napa and picked up a 3/16” straight washer hose connector, a 3/16” Y connector, 8 feet of washer hose, and a check valve. Total cost $25. Then I picked up 2 (1 for a spare) 18 gauge needles from the pharmacy ($3). As it turns out the Napa check valve didn’t work after first installation and testing. :mad: I ended up ordering and using a Kona stock rear washer check valve (Hyundai p/n: 9888629000) from the dealer for $7.

On the rear hatch door, I popped off the top interior trim, the door handle insert, and then the bottom trim panel (there is 1 plastic screw to remove at the bottom), and unscrewed and popped off the side trim panel on the passenger side. Everything is held with standard vehicle push in plastic connectors. Next, I undid the four 10mm nuts holding the rear latch assembly and squeezed the 2 orange plastic pop-in connectors to remove the assembly. There is one electrical connector to disconnect that feeds the camera, license lights and the latch release button.
View attachment 10710
The wires feed through a rubber grommet that pops out, enabling the assembly to be placed on the bench.
View attachment 10711

From the inside of the latch assembly, centered on the camera lens, I drilled a 1/16” hole through the plastic to insert the needle nozzle. Then, clipped the needle’s plastic flange so it would fit inside the washer hose, and then used a Dremel to cut the needle to length, and rounded the edges. I bent the needle slightly so it stays close to the lens and would spray on it. (This was the fiddliest bit of the whole process; I blew water through the hose and needle a few times until I was happy. Rubber washer hose water doesn’t taste good, by the way….). The nozzle is close enough to the camera that you don’t snag on it.
View attachment 10712
View attachment 10713
I secured the needle and hose under the camera, then rerouted the camera cable to make room for the washer hose over to the grommet. I poked a new hole in the grommet, and squeezed the hose through, taping the wire and hose together with electrical tape. The grommet seal is tight to the washer hose. Then I cut the hose in the latch assembly and inserted (on the second attempt) the Hyundai check valve (white side towards the nozzle). This basically prevents the hose from draining when the washer pump is not pushing fluid.
View attachment 10714
I reinstalled the rubber grommet and latch assembly and then cut the hose to insert a straight 3/16” hose connector, so that in the future the latch assembly could be removed by disconnecting the electrical plug and decoupling this fitting.View attachment 10715
I ran the hose above the tail light, then between the metal and the plastic trim to the top of the window.
View attachment 10716
There, I disconnected the original check valve for the top sprayer, and made up a Y to divert the washer fluid to both nozzles. The top check valve is closest to the sprayer, and the Y permits unrestricted flow to the camera check valve.
View attachment 10717

I tested the installation, and when activating the rear washer, it sprays well on both nozzles. I took a quick drive to ensure the moving air didn’t suck out the fluid, and then reinstalled all the interior trim. Overall, I’m pleased with the install, and the nozzle is not noticeable unless you look for it.

Hope this helps anyone looking to try a similar project!
View attachment 10718
 
Looks slick, I might have to do this.
I see your fm NB, what kind of range are you getting?

Of late, since I travel on the highway at 115 km/h to and from work, use winter tires, and I don't skimp on my heat settings, I've been seeing ~24 kw/100 km consumption. When I first got the car in October, I was around 19.6 kW/100 km.
 
I haven't checked that lately .
But avg about 330km per full charge with your similar driving habits.
Instead of using the heat as much on long hwy runs, , I also use an electric blanket as it runs off the 12v battery.
Of late, since I travel on the highway at 115 km/h to and from work, use winter tires, and I don't skimp on my heat settings, I've been seeing ~24 kw/100 km consumption. When I first got the car in October, I was around 19.6 kW/100 km.
 
With the sloppy driving conditions of late, I notice my rear camera lens is always mucked up with grime. I did a little searching, and found a fellow who managed to install a rear camera washer in his Ioniq. (https://www.ioniqforum.com/threads/rear-view-camera-washer.35595/)

He didn’t have a rear washer or wiper, unlike the Kona, so I figured it shouldn’t be that hard to install a second washer nozzle on my car. I headed to Napa and picked up a 3/16” straight washer hose connector, a 3/16” Y connector, 8 feet of washer hose, and a check valve. Total cost $25. Then I picked up 2 (1 for a spare) 18 gauge needles from the pharmacy ($3). As it turns out the Napa check valve didn’t work after first installation and testing. :mad: I ended up ordering and using a Kona stock rear washer check valve (Hyundai p/n: 9888629000) from the dealer for $7.

On the rear hatch door, I popped off the top interior trim, the door handle insert, and then the bottom trim panel (there is 1 plastic screw to remove at the bottom), and unscrewed and popped off the side trim panel on the passenger side. Everything is held with standard vehicle push in plastic connectors. Next, I undid the four 10mm nuts holding the rear latch assembly and squeezed the 2 orange plastic pop-in connectors to remove the assembly. There is one electrical connector to disconnect that feeds the camera, license lights and the latch release button.
View attachment 10710
The wires feed through a rubber grommet that pops out, enabling the assembly to be placed on the bench.
View attachment 10711

From the inside of the latch assembly, centered on the camera lens, I drilled a 1/16” hole through the plastic to insert the needle nozzle. Then, clipped the needle’s plastic flange so it would fit inside the washer hose, and then used a Dremel to cut the needle to length, and rounded the edges. I bent the needle slightly so it stays close to the lens and would spray on it. (This was the fiddliest bit of the whole process; I blew water through the hose and needle a few times until I was happy. Rubber washer hose water doesn’t taste good, by the way….). The nozzle is close enough to the camera that you don’t snag on it.
View attachment 10712
View attachment 10713
I secured the needle and hose under the camera, then rerouted the camera cable to make room for the washer hose over to the grommet. I poked a new hole in the grommet, and squeezed the hose through, taping the wire and hose together with electrical tape. The grommet seal is tight to the washer hose. Then I cut the hose in the latch assembly and inserted (on the second attempt) the Hyundai check valve (white side towards the nozzle). This basically prevents the hose from draining when the washer pump is not pushing fluid.
View attachment 10714
I reinstalled the rubber grommet and latch assembly and then cut the hose to insert a straight 3/16” hose connector, so that in the future the latch assembly could be removed by disconnecting the electrical plug and decoupling this fitting.View attachment 10715
I ran the hose above the tail light, then between the metal and the plastic trim to the top of the window.
View attachment 10716
There, I disconnected the original check valve for the top sprayer, and made up a Y to divert the washer fluid to both nozzles. The top check valve is closest to the sprayer, and the Y permits unrestricted flow to the camera check valve.
View attachment 10717

I tested the installation, and when activating the rear washer, it sprays well on both nozzles. I took a quick drive to ensure the moving air didn’t suck out the fluid, and then reinstalled all the interior trim. Overall, I’m pleased with the install, and the nozzle is not noticeable unless you look for it.

Hope this helps anyone looking to try a similar project!
View attachment 10718
Thanks for those pictures.
I was sure of the existence of a rear door latch switch, and your first picture shows it is there, and easy to disconnect. (similar to the one in the front for the hood). I intend to disconnect/bypass mine this summer to avoid any unwanted issues causing the battery to go dead with a not proper closed hatch, also to drive with the tailgate open (carrying a long load) without the dash warning):)
 
At the front pillar, I needed to also feed up a power cable. I decided to use a dashcam hardwire kit rather than using the cigarette lighter. While I intended to use the top right 20A power outlet circuit, the fuse adapter never maintained solid contact, so I moved it down two to the 15A heated steering wheel circuit, both of which are switched power. I fed this power cable up the door.

Great writeup. Wish I saw it before I did my install- I ended up doing it almost identical, except for going down the passenger side for the rear cam. I also tried the heated steering wheel fuse, heated mirror fuse, and second power outlet fuse all with no luck. I finally got it working with the 30a "AMP" fuse (assuming for the audio system).
 
FINALLY after 1.5 years added the VESS switch (like the European models). No need to pull the dash apart as you can do this thru the fuse panel door.
I would first like to thank mikeselectricstuff and KiwiMe for the schematics and helpful posts to get this accomplished.
So here we go: Begin by removing the connecting plug from the switch panel left side of steering wheel - low (push the interlock tab and pull out plug ) then pull enough cable to work with.
First image shows the proper wire to tap on to, pin 7 of the connector to the switch assembly, green wire - make sure to count from the tab side of the connector.
LGNeqDz.jpg

Next strip a small bit of insulation and solder a 24 AWG stranded about 18 inches long to the green wire, I kept the original green wire maintaining contact with connector (just in case). Not shown is the 200 ohm 1/4 watt resistor which is soldered on that new lead and heat shrink applied, basically new wire lead consists of (9 inches wire, then heat shrink resistor then 9 inches more wire)
gxRSS30.jpg

Next use some good quality tape (scotch super 33 works well) and wrap around the soldered connection and continue the wrap up the existing sleeve for strain relief.
6VlZtkT.jpg

This is the momentary contact switch I selected - note it has a shaft about 5/8 inch long which will come in handy later. I crimped the wires with loops on the switch and on the lead that goes to ground connection (the one flagged with tape will be going to ground).
BAVMY3J.jpg

Next find a good ground to connect the lead off the other side of the switch - I chose a handy screw holding some module close to the area
sCJbqdV.jpg

Last is to mount the switch. The spot I picked is below the steering column on the right side. The material (plastic) is quite thick there so the longer shaft on the switch I picked works perfectly flush. I might advise to remove the insulation first behind the panel as it wraps around the drill bit:oops:No worry I tucked it back up and all is good.
uwJcUbv.jpg

The operation works really well. The VESS comes on every time you start the car and can be silenced with a momentary push of the button. It can be switched on or off as you desire while in gear and driving as well. I liked the idea of the silence but the problem with pulling the plug at the front of the car is there is times when you do need it ie: backing up in a parking lot etc. This way you can leave it on in that situation and shut it off when you go forward if safe to do so.
Enjoy this mod and sorry it took me so long to come up with this.:)
Looks like we are still good to go until 2023 in Canada:
https://electricautonomy.ca/2021/05/13/ev-noise-sound-requirements/
Became law in U.S. year of 2018.
 
This isn’t really a mod to the car, but rather something I found that makes longer drives more comfortable. Our cottage is about a 3 hour drive away, and I like to rest my arms on something while driving. I can rest my left arm on the door OK, but the right side has no such option.

I found this portable armrest on Amazon:
https://www.amazon.ca/CDEFG-Extender-Organizer-Adjustable-Universal/dp/B08131G3Q7/

Centre ArmRest.webp

I chose black with white stitching to match. It is height adjustable, and I flipped the armrest so it juts out over the centre console instead of into the driver. The bottom plastic part wedges in fine between the seat and the console. I only put it in for long drives, since it does make it a little hard to reach the cooled/heated seats button, blocks the centre storage box, and you can feel it on your right butt cheek, but overall, a big thumbs up from me for comfort!
 
So with the 78 degrees in the shade today I decided to install the visors:
aJoqU3O.jpg

lFL4d6Y.jpg

ddFgMFJ.jpg

CwKnwTC.jpg

The last picture showing the molded part in the front (fits perfect)
The third picture shows where my old electrical house meter was (grey box) before I changed the service to 200A and relocated it. I now have hinged cover in its place to allow for the J1772 cable from my inside L2 evse through a 4" insulated hole beneath it.
The install should have been easy but I had to tweek the passenger rear to conform with the 2mm differential between rear visor and rear door window (which Hyundai informed me was too small a difference for warranty issues)
Definitely worth the money, will be so nice to leave the windows open a bit now and should make a huge difference in the winter for defogging windshield:)
I managed to tear off those visors before trading in my 2019 model last October. The weather was above 70 degrees yesterday so I reinstalled them back on to my 21 model. Total cost...$8.46 for some 3m heavy duty tape:)
tsyB3hy.jpg

843NzUe.jpg

tUpgU6Z.jpg

Only exception was the 2 little ones that are cosmetic only for the rear (non opening) small window (they cracked when I took them off as the temperature at the time was cold) no big deal
7LOPV8p.jpg

I notice they are still available, if you are interested, here is the link:
https://www.amazon.ca/Clover-Weathe...ai+kona&qid=1552258047&s=gateway&sr=8-1-fkmr2
 
My previous Elantra GT had three 12V outlets, one in the rear hatch area. I miss the convenience of it, so I purchased an add-on 12V outlet from Canadian Tire, and started an afternoon project. Since the left rear panel would need to be removed, I also decided to do something with the light. My previous Toyota Echo hatchback had a rear light with a toggle switch embedded, so you could decide to activate the light. A simple toggle switch was also picked up at CT, mainly because that was the only one that would mount in a plastic panel easily.

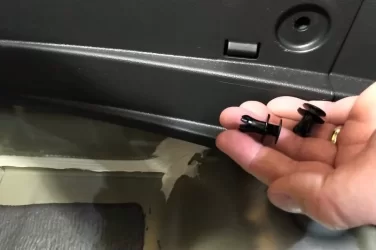
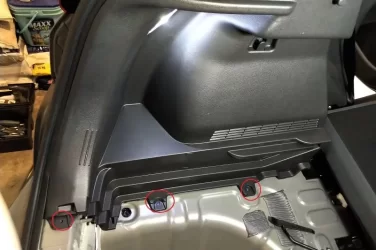
After emptying the hatch area, I removed the 2 pop out black plugs on the rear bottom panel, then snapped out the 4 push-in plastic connectors holding it in place.
01_Rear Plugs.webp
Next, 3 Phillips screws were removed from the bottom of the left rear panel, and a few sharp pulls snapped out some more push-in plastic connectors at the rear edge. I didn’t need to remove the whole panel, so I just propped it open. The lamp power connector simply disconnected by pulling it down.
02_Left Panel.webp 03_Lamp Disconnect.webp

The 12V outlet I bought needed about 2.5 inches behind the panel for the plug and wire connection, so after measuring a probe hole, I chose the flat spot ahead of the net hook.
04_Hole Placement.webp

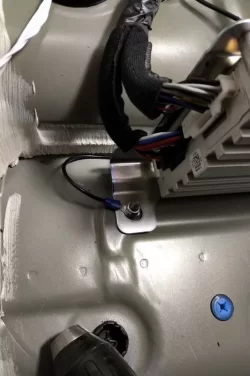
I ran the 12V black lead to a 10 mm nut holding down the amp, and fished the 12V red to the rear door.
06_Ground.webp 09_Door Trim Fishing.webp

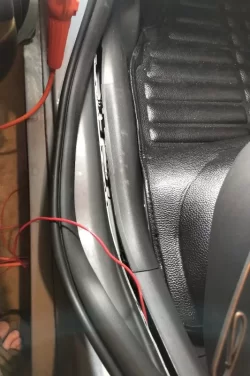
The rubber door trim pulls off easily, so I simply fished the red positive along the bottom of the drivers’ side doors until I made it to the fuse block. There, a “micro” add-a-fuse (from Amazon) with a 10A fuse was added onto a switched circuit. Tested the circuit with the car off, then on, and all good!

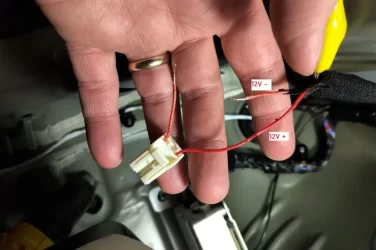
With the panel still pulled off, I then cut the 12V + wire leading to the rear hatch light.
07_Lamp Wire.webp

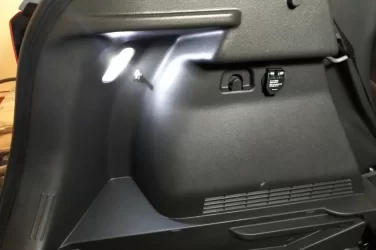
I soldered and shrink-tubed some longer wires that were then connected to the toggle switch, and inserted in a flat spot out of the way by the light. When ‘on’, the light works normally with the hatch opening, and when ‘off’, the light won’t light up, so you can leave the hatch open without draining the 12V battery.
08_Final Panel.webp

I snapped the panels back on, with the screws and plugs, and done!

Hope this gives folks ideas for a similar project!
 
Front grille rock guard, a preventative measure to help avoid a small rock or road debris from puncturing the exposed radiator core when the dampers are open. Install time: 45 minutes to 1 hour, cost: less than $5.
Start by cutting a piece of black plastic leaf gutter guard. The grille hole on the Kona is 5" wide @ center and 4 3/4" wide at the edges. The length varies from 24.5" at the top to 22.5" wide at the bottom (slanted edges). Mask the edges on the leaf guard to allow 1/2" extra material on the top and bottom (basically center the piece on the 6.5" leaf guard material, the extra material will slide into the top slot and bottom slot behind the grille opening after installation, and provides additional support. This is an example of the material I used:
a5L9iRH.jpg

Once you have cut the piece to above spec, the whole piece can be maneuvered into the bottom slot behind the grille from either side. (The slots that I am talking about is the gap between the car body and the nose on the top and bottom). Carefully slide the material sideways behind the radar center portion until it covers the whole opening. As stated above the piece will have about 1/2" tucked in above and below, At this point you can now add the ty-wraps (8) total for support, snug and trim the tails and position the clasps under toward the back where it is less noticeable. All I had on hand were 8" black U/V rated ty-wraps so I installed them and are slightly noticeable, so I will change them to 4" skinny ones next time I am at the hardware store and they should blend in better, But for now... here is what it looks like:
Center
ayIYMAw.jpg

Right side
1gpzBWo.jpg

Left side
QnEhRWU.jpg

The material sits flat and well supported to the nose portion of the grille opening and has no affect on the operation of the dampers:)
 
Unfortunately the Ministry of Leaf Gutter Guards has deemed that they will be 2cm in pitch here in NZ so I can't get the 1cm stuff any more. I'm amazed you were able to do that without disassembly and the jaunty 45° angle looks great.
 
Unfortunately the Ministry of Leaf Gutter Guards has deemed that they will be 2cm in pitch here in NZ so I can't get the 1cm stuff any more. I'm amazed you were able to do that without disassembly and the jaunty 45° angle looks great.
Its starting to grow on me, looks excellent. I did change out the ty wraps to the thinner 4" ones today and are less noticeable. I also tested the radar (the material is not cut in front of the radar unit) and it works well. I had visions of possibly tearing it out and cutting a square section where the radar is, but not required. It's funny as the actual radar component is set back a small bit from the front nose section, allowing one to drag the flexible plastic leaf guard material across when installing, without this, things would have been a lot tougher.
Here is a rough copy of my original design template, it may save a little work for anyone who may want to do this. If the nose cone is removed (for whatever reason) it would pay well to have one pre-made as installation from the back side could be done a lot easier with the use of a few clips.;)
QLwmV7T.jpg

BTW maybe its time to elect a new leaf gutter guard minister:D
 
I want to thank you for doing the heavy lifting to get this to work. I added my own twist to the project. I also have a lease and did not want to drill any holes or leave any evidence of the modification that may be used agents me to void any warranty or get some kind of up charge when the car was returned or just serviced. So my version was to use normally open magnetic reed switch. I opened the button assembly and found the connections on the circuit board. Soldered wires to the connector pcb pins and the reed switch inside the switch assembly. I then mounted the read switch behind the un-used blank switch plate. Re-assembled the button assembly and there is no visible changes to the car. Now swiping a small magnet past the unsuspecting blank switch panel will trigger the mute of the VESS.
IMG_2200.webp IMG_2201.webp IMG_2206.webp IMG_2207.webp IMG_2212.webp IMG_2216.webp IMG_2217.webp IMG_2218.webp IMG_3234.webp
 
With the sloppy driving conditions of late, I notice my rear camera lens is always mucked up with grime. I did a little searching, and found a fellow who managed to install a rear camera washer in his Ioniq. (https://www.ioniqforum.com/threads/rear-view-camera-washer.35595/)

He didn’t have a rear washer or wiper, unlike the Kona, so I figured it shouldn’t be that hard to install a second washer nozzle on my car. I headed to Napa and picked up a 3/16” straight washer hose connector, a 3/16” Y connector, 8 feet of washer hose, and a check valve. Total cost $25. Then I picked up 2 (1 for a spare) 18 gauge needles from the pharmacy ($3). As it turns out the Napa check valve didn’t work after first installation and testing. :mad: I ended up ordering and using a Kona stock rear washer check valve (Hyundai p/n: 9888629000) from the dealer for $7.

On the rear hatch door, I popped off the top interior trim, the door handle insert, and then the bottom trim panel (there is 1 plastic screw to remove at the bottom), and unscrewed and popped off the side trim panel on the passenger side. Everything is held with standard vehicle push in plastic connectors. Next, I undid the four 10mm nuts holding the rear latch assembly and squeezed the 2 orange plastic pop-in connectors to remove the assembly. There is one electrical connector to disconnect that feeds the camera, license lights and the latch release button.
View attachment 10710
The wires feed through a rubber grommet that pops out, enabling the assembly to be placed on the bench.
View attachment 10711

From the inside of the latch assembly, centered on the camera lens, I drilled a 1/16” hole through the plastic to insert the needle nozzle. Then, clipped the needle’s plastic flange so it would fit inside the washer hose, and then used a Dremel to cut the needle to length, and rounded the edges. I bent the needle slightly so it stays close to the lens and would spray on it. (This was the fiddliest bit of the whole process; I blew water through the hose and needle a few times until I was happy. Rubber washer hose water doesn’t taste good, by the way….). The nozzle is close enough to the camera that you don’t snag on it.
View attachment 10712
View attachment 10713
I secured the needle and hose under the camera, then rerouted the camera cable to make room for the washer hose over to the grommet. I poked a new hole in the grommet, and squeezed the hose through, taping the wire and hose together with electrical tape. The grommet seal is tight to the washer hose. Then I cut the hose in the latch assembly and inserted (on the second attempt) the Hyundai check valve (white side towards the nozzle). This basically prevents the hose from draining when the washer pump is not pushing fluid.
View attachment 10714
I reinstalled the rubber grommet and latch assembly and then cut the hose to insert a straight 3/16” hose connector, so that in the future the latch assembly could be removed by disconnecting the electrical plug and decoupling this fitting.View attachment 10715
I ran the hose above the tail light, then between the metal and the plastic trim to the top of the window.
View attachment 10716
There, I disconnected the original check valve for the top sprayer, and made up a Y to divert the washer fluid to both nozzles. The top check valve is closest to the sprayer, and the Y permits unrestricted flow to the camera check valve.
View attachment 10717

I tested the installation, and when activating the rear washer, it sprays well on both nozzles. I took a quick drive to ensure the moving air didn’t suck out the fluid, and then reinstalled all the interior trim. Overall, I’m pleased with the install, and the nozzle is not noticeable unless you look for it.

Hope this helps anyone looking to try a similar project!
View attachment 10718


Brilliant. This is a much needed mod. Has there been any clouding of the lens from the alcohol in the washer fluid?
 
Back
Top