This weekend I finished the installation of my dashcam, the Viofo A129 Pro Duo. This dashcam has both front and rear cameras which connect via a USB (mini) cable. It came with a 6m cable, and I used every inch of it to run the rear camera. This post will focus mainly on how I did it and some tips if you choose to do the same.
Tools I found useful:
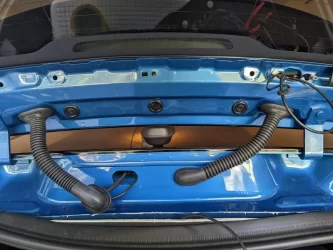
From the back, I removed the trim piece that holds the high-mount brake light. This pops out if you tug hard on it. It'll help if you start from one side instead of the middle. I intended to follow the wire for this light to get my USB cable from the hatch lid into the cabin.
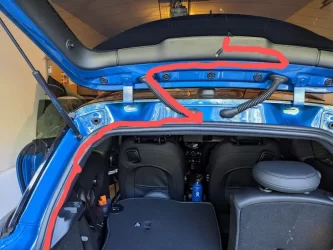
There is a hole in the sheet metal on the right side that's large enough for a USB plug, but unfortunately the right side conduit is too tight to feed anything through. The left one is virtually empty, so I ended up making a zig-zag run inside the hatch itself. I pulled out the rubber conduit and used fishing tape to run the cable through.
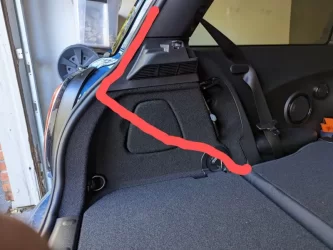
From there, I tucked the wire into the hatch seal all the way to where the plastic trim meets the carpeted side panel. I then ran the cable behind the panel diagonally to the base of the rear seat hinge. This was inelegant but necessary. When I tried following corners and crevices, I ran out of cable at the front, and so when I re-ran the cable, I took shortcuts where I could when it wasn't visible.
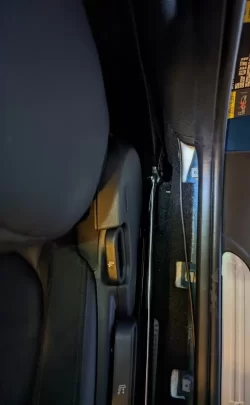
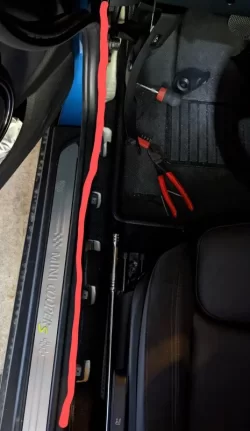
From the rear seat hinge, I ran the cable beneath the seat to the side sill trim piece and inside the door seal. This piece also just pulls out. You'll need the fastener removal tool or pliers to remove the grey fasteners so that you can reattach them to the sill trim. I tried being lazy here by leaving the fasteners in the body, but trying to snap the sill trim back in like this was a waste of time.
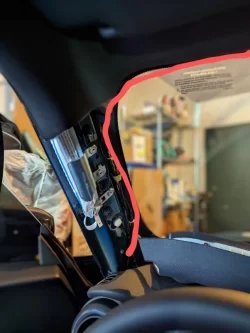
From the floor, the wire runs up the inside of the dash and up the A-pillar. I removed the A-pillar trim because I wanted to secure the USB cable to the existing wire harness so as to avoid the airbag. From there, I ran it across the top of the windshield to my camera, which is mounted to the right of my mirror.
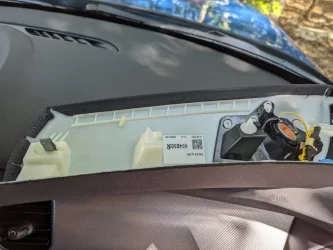
Reattaching the A-pillar trim is a huge pain. I included some pics from the other side so that you can see where the fasteners are. Most likely when you try to reattach it, the bottom or middle fastener will get knocked off and fall to the bottom of the floor. This is when I removed the hood latch handle and trim using a torx bit. While it also helped me run the cable better, the main purpose was to find the fallen A-pillar fasteners.
In all, it took me about two hours to do, mainly because I had to re-do it several times. Take your time and make sure the cable isn't blocking anything or in a place where it'll be crushed.
A-pillar trim backside. Three fasteners: two white plastic ones and a metal clip
Tools I found useful:
- plastic trim tool
- pliers or trim fastener removal tool (I used a snap-on ASG186B, but there are many like it)
- fish tape or a stiff wire
- torx bit to remove the hood release and trim (T-15 or T-20, I forget)
From the back, I removed the trim piece that holds the high-mount brake light. This pops out if you tug hard on it. It'll help if you start from one side instead of the middle. I intended to follow the wire for this light to get my USB cable from the hatch lid into the cabin.
There is a hole in the sheet metal on the right side that's large enough for a USB plug, but unfortunately the right side conduit is too tight to feed anything through. The left one is virtually empty, so I ended up making a zig-zag run inside the hatch itself. I pulled out the rubber conduit and used fishing tape to run the cable through.
From there, I tucked the wire into the hatch seal all the way to where the plastic trim meets the carpeted side panel. I then ran the cable behind the panel diagonally to the base of the rear seat hinge. This was inelegant but necessary. When I tried following corners and crevices, I ran out of cable at the front, and so when I re-ran the cable, I took shortcuts where I could when it wasn't visible.
From the rear seat hinge, I ran the cable beneath the seat to the side sill trim piece and inside the door seal. This piece also just pulls out. You'll need the fastener removal tool or pliers to remove the grey fasteners so that you can reattach them to the sill trim. I tried being lazy here by leaving the fasteners in the body, but trying to snap the sill trim back in like this was a waste of time.
From the floor, the wire runs up the inside of the dash and up the A-pillar. I removed the A-pillar trim because I wanted to secure the USB cable to the existing wire harness so as to avoid the airbag. From there, I ran it across the top of the windshield to my camera, which is mounted to the right of my mirror.
Reattaching the A-pillar trim is a huge pain. I included some pics from the other side so that you can see where the fasteners are. Most likely when you try to reattach it, the bottom or middle fastener will get knocked off and fall to the bottom of the floor. This is when I removed the hood latch handle and trim using a torx bit. While it also helped me run the cable better, the main purpose was to find the fallen A-pillar fasteners.
In all, it took me about two hours to do, mainly because I had to re-do it several times. Take your time and make sure the cable isn't blocking anything or in a place where it'll be crushed.


A-pillar trim backside. Three fasteners: two white plastic ones and a metal clip

Last edited:
