Young J Kwak
Member
Hi All!
Just installed the body side molding and took some pics / clips of vids during the process.
Of note, I have had prior experience as an automotive tech and have done these installs in the past. Nonetheless, this is a very easy job to do, and well worth it.
The body side moldings can prevent a significant amount of door dings - my honda pilot's body side moldings have many dents / scratches in it to prove the point.
WHAT YOU WILL NEED:
- warmer weather is favorable
- No rinse wash solution OR washing the car + microfiber to clean any grime
- isopropyl alcohol or alcohol pads (no, tennessee whiskey wont do the trick here)
- scotch tape / clear tape of some sort to hold up the templates
- a little patience and some good lighting
INSTRUCTIONS:
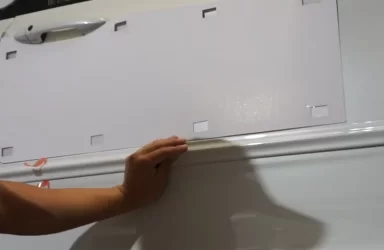
- clean the areas of the install to remove dust / grime
- apply some clear tape to the upper left and right corners of the template that comes with the kit
- on the Ends of the trim - remove the film over the double sided tape
- only remove a portion of the film over the center strips of double sided tape so you have a curly "pigs tail" hanging down
- align the body side molding to the template edge on the middle of the car (between the passenger and driver door)
- press the end down that you are starting with to get some adhesion
- you can now either align and press down the other side (far end)
OR
- you can press down the central portion and work your way down
- as you go down along the trim piece, pull at the "pigs tail" of loosened film covering
- start with the TOP part to get proper alignment along the templates
- remove the film from the bottom part while pressing firmly as you go along
- the instructions call for a "rubber roller", but firm finger pressure along all adhesive edges is sufficient


Just installed the body side molding and took some pics / clips of vids during the process.
Of note, I have had prior experience as an automotive tech and have done these installs in the past. Nonetheless, this is a very easy job to do, and well worth it.
The body side moldings can prevent a significant amount of door dings - my honda pilot's body side moldings have many dents / scratches in it to prove the point.
WHAT YOU WILL NEED:
- warmer weather is favorable
- No rinse wash solution OR washing the car + microfiber to clean any grime
- isopropyl alcohol or alcohol pads (no, tennessee whiskey wont do the trick here)
- scotch tape / clear tape of some sort to hold up the templates
- a little patience and some good lighting
INSTRUCTIONS:
- clean the areas of the install to remove dust / grime
- apply some clear tape to the upper left and right corners of the template that comes with the kit
- on the Ends of the trim - remove the film over the double sided tape
- only remove a portion of the film over the center strips of double sided tape so you have a curly "pigs tail" hanging down
- align the body side molding to the template edge on the middle of the car (between the passenger and driver door)
- press the end down that you are starting with to get some adhesion
- you can now either align and press down the other side (far end)
OR
- you can press down the central portion and work your way down
- as you go down along the trim piece, pull at the "pigs tail" of loosened film covering
- start with the TOP part to get proper alignment along the templates
- remove the film from the bottom part while pressing firmly as you go along
- the instructions call for a "rubber roller", but firm finger pressure along all adhesive edges is sufficient
")